Growing Garlic
Garlic is a plant in the onion family that’s grown for its distinctive taste. Human research has supported many health benefits of garlic.
Garlic, planted in autumn, is ready to harvest in mid- to late summer when the leaves turn yellow. Beyond its intense flavor and culinary uses, “the stinking rose” is also good in the garden as an insect repellent and has been used for centuries as a home remedy. See our Growing Guide to Garlic for planting, growing, and harvesting tips.
Planting
When to plant garlic
- Garlic is most often planted in the fall (between September and November). Garlic roots develop during the fall and winter—before the ground freezes—and by early spring, they start producing foliage. Then, you’ll harvest in the summer.
- Garlic needs a cold period of at least 40˚F for about 4 to 8 weeks.
- However, you can also plant garlic in the spring, especially if you have a long growing season. The cloves won’t be as large, but you’ll enjoy the garlic scapes which are delicious shoots with a mild garlic flavor. Enjoy on eggs, in salads, as a pizza topping, or in stir-fries.
- If you live in the South or Southwest, plant the cloves anytime from the fall through early spring (March). Plant early because garlic doesn’t do well once the weather gets hot.
How to choose a planting site
- Select a gardening area that receives 6 to 8 hours of sunlight per day.
- Prepare soil by removing weeds and mixing in healthy additions of compost.
- If you plant in the spring, wait until the soil has thawed and drained. Once soil crumbles apart easily, it’s time to plant.
- For an easy and large harvest, garlic grower Robin Jarry of Hope, Maine, suggests using heavily mulched raised beds, especially in heavy soil. “I plant in raised beds for good drainage, and then mulch with about 6 inches of old hay after the ground freezes. I never water my garlic—I like low-maintenance vegetables!” Raised beds should be 2 to 3 feet wide and at least 10 to 12 inches tall.
- Before planting cloves, work a couple tablespoons of 5-10-10 complete fertilizer, bone meal or fish meal into the soil several inches below where the base of the garlic will rest.
How to plant garlic
- Get cloves from a mail order seed company or a local nursery.
- Do not use cloves from the grocery store for planting. They may be unsuitable varieties for your area, and most are treated to make their shelf life longer, making them harder to grow.
- Select large, healthy cloves, free of disease. The larger the clove, the bigger and healthier the bulb you will get the following summer.
- Break apart cloves from the bulb a few days before planting, but keep the papery husk on each individual clove.
- Place cloves 2 to 4 inches apart and 2 inches deep, in their upright position (the wide root side facing down and pointed end facing up).
- Plant in rows spaced 10 to 14 inches apart.
Care
How to grow garlic
- Northern gardeners should mulch heavily with straw to ensure proper overwintering.
- Mulch should be removed in the spring after the threat of frost has passed. (Young shoots can’t survive in temps below 20°F / -6°C on their own.
- In the spring, as warmer temperatures come, shoots will emerge through the ground.
- Cut off any flower shoots that emerge in spring. These may decrease bulb size.
- Fertilize garlic in the early spring by side dressing with a nitrogen-heavy fertilizer such as blood meal, chicken manure, or a store-bought pelleted fertilizer.
- Fertilize again just before the bulbs begin to swell in response to lengthening daylight (usually early May in most regions).
- Weeds should not be a problem until spring. However, keep the planting site well weeded. Garlic doesn’t do well with competition—it needs all available nutrients!
- Garlic is a heavy feeder which requires adequate levels of nitrogen. Fertilize more if you see yellowing leaves.
- Water every 3 to 5 days during bulbing (mid-May through June). If May and June are very dry, irrigate to a depth of two feet every eight to 10 days. As mid-June approaches, taper off watering.
Pests/Diseases
Garlic has very few problems with pests in the garden (in fact, its a natural pest repellent), and also very few problems with the diseases that plague other veggies. White rot is one concern, but you should also keep an eye out for the same pests that plague onions.
- White Rot is a fungus that may attack garlic in cool weather. Not much can be done to control or prevent that problem except rotating your crops and cleaning up the area after harvesting. The spores can live in the soil for many years. The fungus affects the base of the leaves and roots.
Harvest/Storage
How to harvest garlic
- Harvest from fall plantings will range from late June to August. In Southern climates, it will depend on your planting date.
- The clue is to look for yellowing foliage. Harvest when the tops just begin to yellow and fall over, but before they are completely dry.
- Before digging up your whole crop, it’s time for a sample! Lift a bulb to see if the crop is ready. We often dig up a bulb before the tops are completely yellow (in late June or early July) as some garlic types will be ready earlier. The garlic head will be divided into plump cloves and the skin covering the outside of the bulbs will be thick, dry and papery.
- If pulled too early, the bulb wrapping will be thin and disintegrate.
- If left in the ground too long, the bulbs sometimes split apart. The skin may also split, which exposes the bulbs to disease and will affect their longevity in storage.
- To harvest, carefully dig (don’t pull or yank by hand!) up the bulbs using a garden fork. Avoid damaging the roots and especially the root-plate (where they attach to the bulb). Lift the plants, carefully brush off surplus soil but do not remove any foliage or roots before putting them to dry thoroughly.
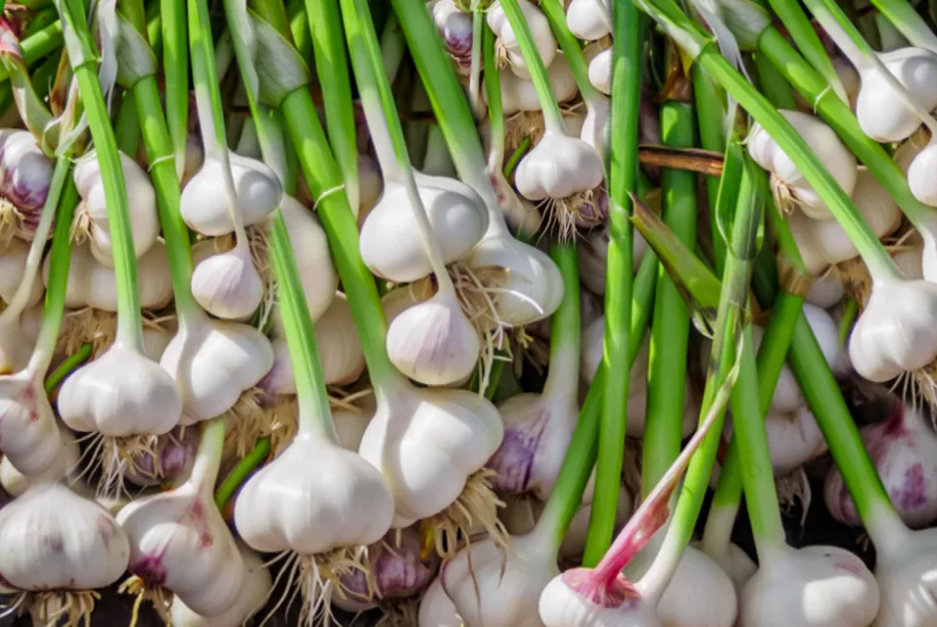
- Let them cure in an airy, shady, dry spot for two weeks. We hang them upside down on a string in bunches of 4 to 6 or you can leave them to try on a home-made rack made from chicken wire stretched over posts. Make sure all sides get good air circulation.
- After a few weeks, the garlic should be totally dry and ready to store.
How to store garlic
- The bulbs are cured and ready to store when the wrappers are dry and papery and the roots are dry. The root crown should be hard, and the cloves can be cracked apart easily.
- Once the garlic bulbs are dry, you can store them. Trim off any roots or leaves. Keep the wrappers on—but remove the dirtiest wrappers. Remove the tops and roots.
- Bulbs should be stored in a cool (40°F / 4°C), dark, dry place, and can be kept in the same way for several months. Don’t store in your basement if it’s moist! Do not store garlic in the refrigerator, either.
- The flavor will increase as the bulbs are dried. Properly stored, garlic should last until the next crop is harvested the following summer.
- If you plan on planting garlic again next season, save some of your largest, best-formed bulbs to plant again in the fall.
Recommended Varieties
- Hardneck varieties are extremely cold hardy so opt for these if your winters are harsh. They produce “scapes” or flower stems which must be removed to encourage the bulbs to reach their full potential. The scapes themselves are an early summer treat, delicious as chopped into salads or added to stir-fries. Hardnecks grow one ring of cloves around a stem, there is not a layer of cloves as there is in softneck varieties. While they are cold hardy, hardnecks do not store as well or long as other varieties. Flavor is milder than softnecks.
- Softneck varieties, like their name suggests, have necks that stay soft after harvest, and therefore are the types that you see braided. Softnecks are especially recommended for those in warmer climes, as it is less winter-hardy than other types. They have strong, intense flavor and tend to grow bigger bulbs because energy is not being diverted to top-set bulblets like hardnecks.
Website: www.almanac.com